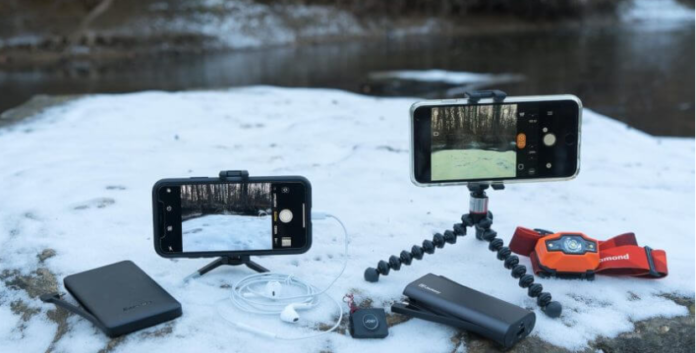
Modern smartphones have completely changed outdoor photography.
You no longer need to carry a heavy camera system to capture beautiful hiking photos. Today’s smartphones use advanced computational photography, powerful sensors, and intelligent image processing to create impressive images even in challenging outdoor environments.
However, great hiking photos usually do not happen by accident.
The best outdoor photographers understand light, composition, timing, and simple techniques that help their cameras perform better.
With a few basic skills and lightweight accessories, you can dramatically improve your smartphone hiking photography without adding much weight to your backpack.
Your smartphone is already one of the most valuable tools you carry on the trail. Learn how to use it properly, and you can capture memories that last a lifetime.
Why Smartphones Are Great Hiking Cameras
For most hikers, the best camera is the one they already have with them.
Modern smartphones from brands like Apple, Google, and Samsung use advanced computational photography to improve:
- Dynamic range
- Color accuracy
- Exposure balance
- Detail recovery
- Low-light performance
- Image stabilization
These improvements allow smartphones to compete with much larger cameras in many outdoor situations.
A dedicated camera still has advantages, especially for professional landscape photography or wildlife photography, but smartphones offer something extremely important for hikers:
Convenience.
You can quickly capture:
- Mountain views
- Wildlife encounters
- Sunrise and sunset scenes
- Trail moments
- Camp life
- Group photos
The camera you actually use will always beat the expensive camera left at home.
1. Take More Photos — Don’t Wait for the Perfect Shot
The first rule of outdoor photography is simple:
Take the photo.
Many hikers miss incredible moments because they hesitate.
Weather changes quickly in the mountains. Light can disappear within minutes. Clouds, storms, and changing conditions often create the most dramatic scenes.
Instead of waiting for perfect conditions:
- Experiment with different angles
- Take multiple compositions
- Capture unexpected moments
- Try photos from different distances
Some of the best outdoor images happen when you simply stop and look around.
2. Clean Your Camera Lens Before Shooting
One of the easiest ways to improve smartphone photos is also one of the most ignored:
Clean your lens.
Phones spend most of their time in pockets, backpacks, and hands. Dirt, fingerprints, sunscreen, and dust can create:
- Blurry images
- Reduced contrast
- Strange light reflections
- Hazy photos
Before important shots:
- Wipe your lens with a microfiber cloth
- Avoid touching the camera area
- Check for dust or moisture
A clean lens can make a bigger difference than many editing apps.
3. Use Camera Apps With Manual Controls
Your phone’s default camera app is usually excellent, but advanced users can benefit from apps that provide more control.
Useful manual features include:
- ISO adjustment
- Shutter speed control
- Manual focus
- RAW photo capture
- Exposure adjustment
Manual controls are especially useful for:
- Sunrise photography
- Sunset photography
- Night sky images
- Waterfall photography
- Low-light conditions
RAW format is valuable because it preserves more image information, allowing greater flexibility during editing.
4. Carry a Small Tripod for Sharper Photos
A lightweight smartphone tripod is one of the most useful photography accessories for hikers.
A tripod helps eliminate:
- Camera shake
- Blurry low-light photos
- Poorly framed selfies
It is especially helpful during:
- Sunrise
- Sunset
- Night photography
- Long exposure shots
- Group photos
Flexible mini tripods are popular because they can:
- Wrap around branches
- Stand on uneven rocks
- Fit easily inside a backpack
A tripod adds very little weight but greatly expands what your smartphone can do.
5. Use a Remote Shutter Button
Pressing your phone screen to take a photo can create small movements that reduce sharpness.
A Bluetooth remote shutter solves this problem.
It helps with:
- Stable landscape photos
- Self portraits
- Group photos
- Long exposure images
Other options include:
- Using your phone timer
- Using smartwatch camera controls
- Using wired headphone volume buttons as a shutter on some devices
Small accessories like these make solo hiking photography much easier.
6. Move Closer Instead of Using Digital Zoom
One common smartphone photography mistake is relying on zoom.
Digital zoom usually does not create more detail. It simply crops the image and reduces quality.
Instead:
- Walk closer to your subject
- Change your shooting position
- Use natural framing
Getting physically closer usually creates a much stronger image.
For landscape photography:
Instead of only photographing a mountain from far away, include:
- Foreground rocks
- Trees
- A trail
- A person for scale
Adding depth makes outdoor photos feel more immersive.
7. Pay Attention to Sun Direction
Lighting is one of the biggest factors in photography.
The easiest rule:
Keep the sun behind you or at a 45-90 degree angle.
This usually creates:
- Better colors
- More detail
- Stronger contrast
Shooting directly into the sun often causes:
- Washed-out images
- Loss of detail
- Lens flare
However, backlighting can also create beautiful artistic photos when used intentionally.
Sunrise and sunset are often the best times because the softer light creates:
- Warm colors
- Long shadows
- More dramatic landscapes
8. Review Your Photos Immediately
Outdoor moments are often impossible to repeat.
After taking an important photo, quickly check:
Sharpness
Zoom in and confirm:
- Important details are clear
- Faces are sharp
- The subject is focused
Exposure
Check whether:
- Bright areas are overexposed
- Shadows still contain detail
Composition
Look for:
- Cut-off mountains
- Distracting objects
- Poor framing
- People in awkward positions
Taking five extra seconds can save a missed photo opportunity.
9. Edit Your Photos With Simple Apps
A good photo can become a great photo with basic editing.
Popular mobile editing tools include:
- Snapseed
- Lightroom Mobile
- VSCO
Useful adjustments:
- Exposure
- Contrast
- Highlights
- Shadows
- Color temperature
- Sharpness
The goal is not to create unrealistic images.
Good editing should help the photo look closer to what you experienced outdoors.
10. Protect Your Phone and Manage Battery Life
Your smartphone is both your camera and often your navigation device, so protecting battery life is important.
Helpful strategies:
- Reduce screen brightness
- Turn off unnecessary apps
- Use airplane mode when appropriate
- Download offline maps before trips
- Carry a lightweight power bank
A dead phone means:
- No photos
- No navigation
- No emergency communication
A small backup battery can be one of the most valuable electronics in your backpack.
Bonus Hiking Photography Tips
Shoot During Golden Hour
Professional outdoor photographers often plan around:
- Sunrise
- Sunset
During these times, light is softer and more dramatic.
The same mountain can look completely different depending on the time of day.
Use Your Headlamp for Early Photography Missions
The best light often happens before sunrise.
A reliable headlamp helps you:
- Reach viewpoints safely
- Set up equipment
- Return after sunset
Create Better Selfies
Instead of holding your phone at arm’s length:
- Place your phone on a tripod
- Use a remote shutter
- Include the landscape around you
A person in the frame helps show:
- Scale
- Adventure
- The size of the environment
Protect Your Phone From the Elements
A simple protection system works well:
- Lightweight phone case
- Screen protector
- Waterproof zip bag
This protects your phone from:
- Rain
- Dust
- Sand
- Scratches
without adding unnecessary weight.
How to Stabilize Your Phone Without a Tripod
You do not always need dedicated equipment.
Nature provides plenty of temporary solutions:
- Rest your phone against a rock
- Lean it against a tree
- Use your backpack as support
- Place it on folded clothing
For sharper images:
- Use a timer
- Avoid touching the phone during exposure
Small improvements in stability can make a big difference.
Final Thoughts: Better Hiking Photos Start With Better Habits
Great smartphone hiking photography is not about owning the most expensive device.
It is about:
- Understanding light
- Choosing better compositions
- Using simple accessories
- Taking more opportunities
- Practicing consistently
Your smartphone is already capable of capturing incredible outdoor moments.
With a few lightweight tools and better techniques, you can create hiking photos that truly represent your adventures.